Snake Dike
Snake Dike is a classic climb within Yosemite National Park which ascends the southwest side of Half Dome. While the approach and descent makes for a long day, the climbing itself and the views attained definitely make it worth it and should be on the tick list of any climber.
While doing laps on a Tuesday evening in the climbing gym, I asked my friend Langston if he was interested in climbing Half Dome via Snake Dike. After a five minute conversation we decided to go for it and set a date for two weeks out.
This would be Langston's second time on real rock, and my first time doing a multipitch climb beyond three pitches so it was a bit of uncharted territory for both of us but after pouring over topos and trip reports for the past year I decided this was the best time to go for it.
I'm going to break this down into three parts, the plan (which for once was actually executed), the trip report interspersed with some beta, and then the lessons learned and takeaways.
Snake Dike is no slouch of a climb. With a 6 mile approach containing 4,000 feet of climbing you will definitely be worked before the climb even starts. And then after the 8 pitches of amazing climbing you will have to ascend the never ending slabs and then descend the 7.5 miles back to the valley.
Your plan may differ from ours depending on when you go. We decided on mid July to avoid the crowds. The sacrifice though would be we would need to start early to beat the heat on the climb and then just deal with it on the descent.
Map
Topo
Gear
Technical climbing gear will be covered in the climbing portion below.
We each carried these items:
The Approach
Standard way is up the Mist Trail but we decided to skip it and go up the John Muir Trail to avoid getting our gear wet. The sun ends up on the face mid morning so we left early to climb in the shade as much as we could.
To move fast we planned to start with 1L of water and fill up all 3L as close to the climb as we could get.
Start time: 3:00 am
Reach the base of the climb: 7:00am
Distance: 6.5 miles
Elevation Gain: 4,000 feet
The Climb
Honestly I can't do much better than the SuperTopo guide. 8 pitches of slab ranging from 5.7 to 5.2, all R rated. All the pitches are described in great detail in the topo so go with that.
Here is the gear we brought:
Reach the summit: 11:00 am
The Descent
Just follow the conga line of people heading up the cables and descend the standard Half Dome approach. Intersect with the Mist Trail and make your way back to the car.
Begin Descending: 11:30 am
Back to the car: 3:30 pm
Distance: 7.5 miles
After arriving at 3:00 am we stowed our extra food, grabbed our packs, and started hiking fifteen minutes later. We made our way up the Mist Trail and veered right onto the John Muir Trail to begin the grind upwards.
Eventually we made it to Clark Point. We took a short snack break and continued on toward Nevada Falls. To our surprise there was still water dripping from a section of overhanging rock on our right side. We ran through to keep our gear dry.
At 4:45 am we made it to the top of Nevada Falls, admired the darkness, and continued on the JMT. Here we began the search for the climbers trail in the dark. The description says it is where the shoulder of Liberty Cap ends, which is difficult to locate. We walked about 3/4 of a mile and started looking around. Eventually we found it, marked by two small rocks stacked up. We found it again during the daylight and it still was not super obvious so here are a couple of pictures.
After getting on the climbers trail, we followed the cairns and use trail as best we could. It started moving upwards until we were gifted with a great view of the southeast face of Half Dome. From there we began to descend towards Lost Lake. We lost the climbers trail a few times and the key was to stay right and veer downwards. If it is super brushy, probably not the way. Eventually the trail became extremely obvious and we were able to find it again and take it to Lost Lake. We crossed a small creek where we filled up all of our water bottles, each of us carrying 3 liters.


 |
| The cables side of half dome |
While doing laps on a Tuesday evening in the climbing gym, I asked my friend Langston if he was interested in climbing Half Dome via Snake Dike. After a five minute conversation we decided to go for it and set a date for two weeks out.
This would be Langston's second time on real rock, and my first time doing a multipitch climb beyond three pitches so it was a bit of uncharted territory for both of us but after pouring over topos and trip reports for the past year I decided this was the best time to go for it.
I'm going to break this down into three parts, the plan (which for once was actually executed), the trip report interspersed with some beta, and then the lessons learned and takeaways.
 |
| Views on the last pitch |
Trip Logistics
Snake Dike is no slouch of a climb. With a 6 mile approach containing 4,000 feet of climbing you will definitely be worked before the climb even starts. And then after the 8 pitches of amazing climbing you will have to ascend the never ending slabs and then descend the 7.5 miles back to the valley.
Your plan may differ from ours depending on when you go. We decided on mid July to avoid the crowds. The sacrifice though would be we would need to start early to beat the heat on the climb and then just deal with it on the descent.
Map
Topo
Gear
Technical climbing gear will be covered in the climbing portion below.
We each carried these items:
- 25L packs
- Windbreaker
- Light fleece
- 2,000 calories of food
- 3L total of water capacity
- Water filter
- Headlamp
- Hat (very very recommended)
- Pair of gloves (also very very nice)
The Approach
Standard way is up the Mist Trail but we decided to skip it and go up the John Muir Trail to avoid getting our gear wet. The sun ends up on the face mid morning so we left early to climb in the shade as much as we could.
To move fast we planned to start with 1L of water and fill up all 3L as close to the climb as we could get.
Start time: 3:00 am
Reach the base of the climb: 7:00am
Distance: 6.5 miles
Elevation Gain: 4,000 feet
The Climb
Honestly I can't do much better than the SuperTopo guide. 8 pitches of slab ranging from 5.7 to 5.2, all R rated. All the pitches are described in great detail in the topo so go with that.
Here is the gear we brought:
- 6 Cams (Black Diamond C4s)
- 1 x .3 (blue)
- 2 x .5 (purple)
- 2 x .75 (green)
- 1 x 1 (red)
- 7 DMM Walnuts
- Sizes 5 to 11
- 7 quickdraws
- 5 alpine style
- 2 normal
- 2 sets of anchor cord (20 feet each)
- 1 dyneema sling (120 cm)
- 2 belay devices
- 12 locking caribiners
- 1 prusik with a non locker attached.
- 9.8 mm 60 meter rope.
Reach the summit: 11:00 am
The Descent
Just follow the conga line of people heading up the cables and descend the standard Half Dome approach. Intersect with the Mist Trail and make your way back to the car.
Begin Descending: 11:30 am
Back to the car: 3:30 pm
Distance: 7.5 miles
Trip Report
We left the Bay Area mid day on Friday and arrived just outside the park at 5:00 pm. We were overzealous thinking that we would be able to get to sleep early in order to be rested for the next morning. Both Langston and I maybe slept about two hours each. At 1:45 am we woke up and drove to the Happy Isles Trailhead.After arriving at 3:00 am we stowed our extra food, grabbed our packs, and started hiking fifteen minutes later. We made our way up the Mist Trail and veered right onto the John Muir Trail to begin the grind upwards.
Eventually we made it to Clark Point. We took a short snack break and continued on toward Nevada Falls. To our surprise there was still water dripping from a section of overhanging rock on our right side. We ran through to keep our gear dry.
 |
| Langston getting a bit wet from the water dripping from the wall. |
 |
| Take the left turn here. |
 |
| This way to climbing!! |
We continued onward following the trail on the southern end of Lost Lake.
 | |
| Lost Lake |
 |
| The obvious trail |
The trail eventually dumped us out into a clearing. We followed the very obvious cairns and continued upwards toward the southeast face of Half Dome.

With a little bit of light bushwhacking we eventually started up the rocky slopes. The climb was steep and required a little bit of extra bushwhacking we were rewarded with great views of the face.
 |
| Southeast Face of Half Dome |
Eventually the scrambling lead us to a field of boulders to the right of a blank slab. After making our way up the boulders, we realized if we got too close the traverse across the slabs would get pretty difficult. We hung a left following a slight ledge on the slab with no hands but good feet. A fall would have have been quite uncomfortable.
 |
| Langston showing his sweet dance moves while traversing the slabs. |
After we made it across the slabs we continued scrambling upwards getting closer and closer to the southeast face. Eventually our progress was stopped and we continued west following the obvious ledge system.
 | ||
| The ledge system continues hugging the face on the right. |
 |
| Langston finishing up the ledges. |
The ledges maxed out at class three terrain but all falls would most likely be fatal. None of the moves are very difficult so as long as you stay focused you'll be fine. Both of us were in trail runners and had no issues.
Eventually our progress was stopped by a large formation that forced us to move around to it's left. Just follow the cairns and it will get you to the base of the climb.
 |
| Head right for the climb |
 |
| Mt. Clark in the distance |
After some more class two scrambling and cairn following we were able to see the base of the climb. We continued onward on a low angle slab to get to the start.
 |
| Langston booking it up the slabs |
Pitch 1
Now that we were at the base, it was time to climb! Eight pitches of leading run out slab, what isn't there to love? We took a quick snack break and then I began up the first pitch at around 7:20 am. After some online research I decided to do the alternate start and go left up to a small tree and then veer slightly right on the slabs to get on route. This was a great decision, the climbing was very straightforward and the protection was adequate. It looks a lot steeper in the photo below than it actually is.
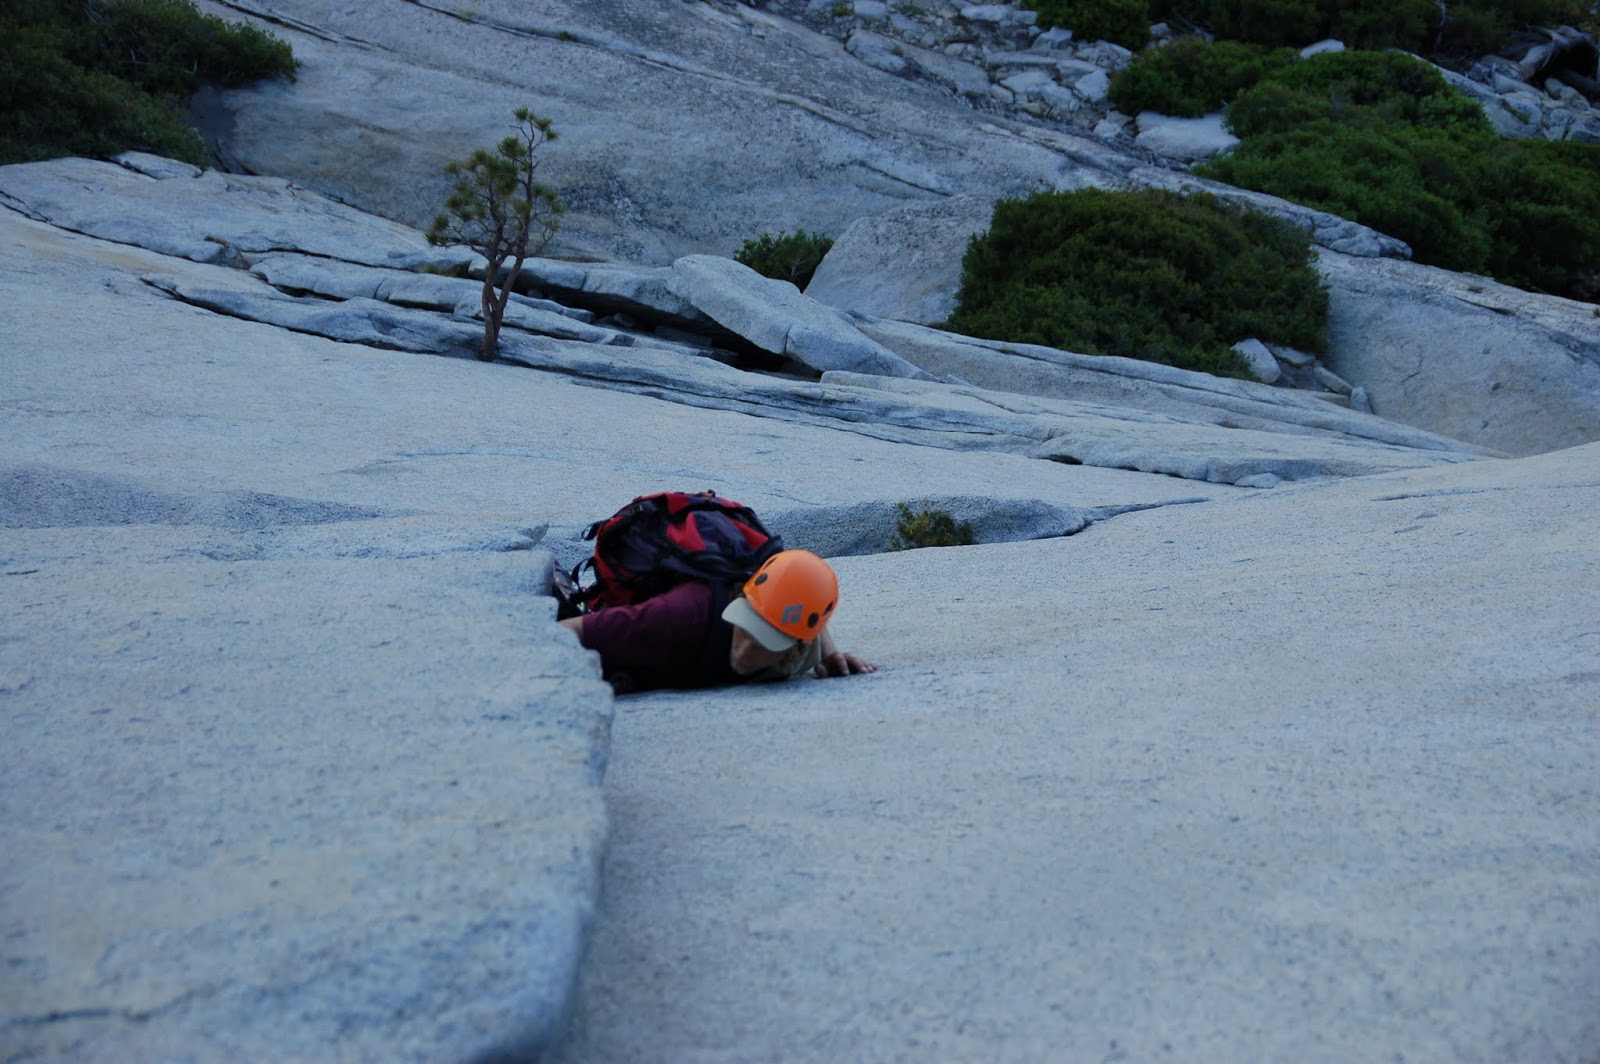 |
| Langston cleaning a nut I put in. The tree I slung can be seen below. |
With the 60m rope we were able to reach the 2 bolt anchor. It was a bit of a tight squeeze, maybe two or three feet of rope left but if your second is willing to simul a few feet of some easy slab or move around a bit you should make it just fine.
Pitch 2
After that we were onto pitch two. After traversing right on extremely good feet you are forced to stem across onto a well textured tan colored part of slab. Continue upwards to the right following the jugs and continuing over a mini steep part onto a dike. Follow it for a bit to a solid two bolt anchor.
Pitch 3
Onto pitch 3, the crux of the route. From the anchor you will see two bolts, one straight up and slightly to the left of the dike you are currently on and another farther left on the slab. Shoot for the one on the slab. I clipped it with a short draw and had no issues. This traverse is now the the mental and physical crux. I ended up staying a little lower than I originally thought and it went just fine. Most of the crux is just pawing around with your foot trying to find a spot that has good friction. As you traverse left towards the big dike I maintain that the lowest line possible is the best line. You may be tempted to use the smaller dike that veers left into the main dike as your feet. I tried that and was not a fan. I ended up down climbing, staying low. and using the small dike as handholds to get me onto the main upward facing dike. After getting onto the main dike you will see a two bolt anchor which has some webbing on it. Do not clip this, your poor follower will be scared out of their mind during their traverse. The climbing here is easy, no more than 5.4, but definitely run out. You will clip another bolt about midway up the pitch.
 |
| Langston starting up from the anchor. |
 |
| Langston moving up the dike |
Pitch 4
You made it. The belay bolts here straddle the dike so the 120 cm sling that I brought didn't quite cut it. I was forced to use my cord to create an acceptable anchor. This pitch contains more 5.4 R dike. Just go straight upwards. I passed the first uninspiring two bolt anchor, clipping both just to be safe. Eventually I made it to the next better two bolt anchor and belayed Langston up.
 |
| Langston low on pitch 4 |
 |
| Here he comes! |
Pitch 5
The dike splits into two. Follow the right leaning dike. You'll start with some nice edges and good friction and move on to a larger formation. Hang to the left and follow the fingers moving upwards. There is room for a couple of small cam placements here. Continue upwards and run it out to the anchor near the big hole in the rock. Also please do not pee in the hole, that's gross.
 |
| Look at that view |
Pitch 6
This is by far one of the most run out pitches. There are no bolts just some horns that you can try and sling. Most of the horns are there for moral support, the only one I think would hold in case of a fall is fairly close to the anchor at the top. Eventually you will hit a bolt near a steeper section of fun climbing. Stay left for the easiest experience. You are then rewarded with a comfortable belay at two bolts.
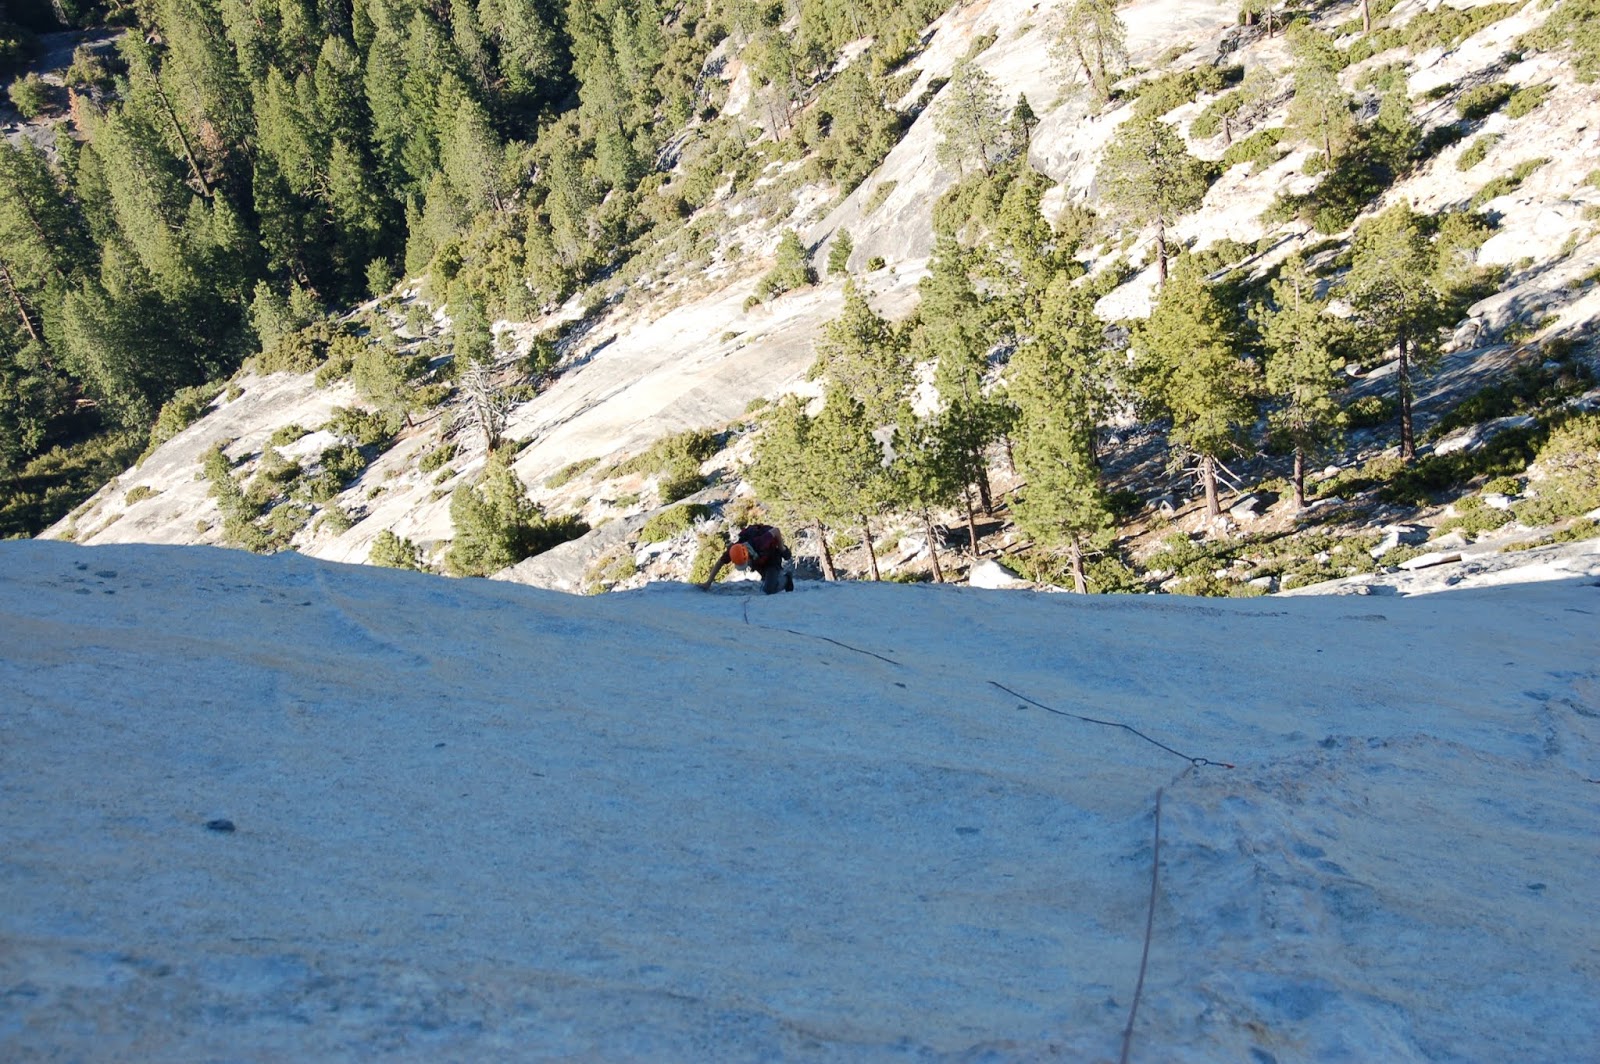
Pitch 7
We were slowing down a bit. Our calves were beginning to burn a little bit and the sun was leaking onto the face. Despite that we trudged onward. Continue upwards onto 5.2 slab. Eventually you will hit a lie back section that leads to a comfortable ledge. I made my belay here. The topo recommends that you continue upwards on a right facing lay back using thin fingers and traverse left using the small roof as under clings. The traverse looks a little sketchy from below but you can get a small cam in from a secure stance before starting. The holds are also quite good and the friction on the face below is above average. Just be aware that the belay will take gear and you may not have very much if you are traveling light like us.
We ultimately made the belay in quite a nice place. Because the ledge was quite nice I went with a two piece anchor to save gear for the next pitch. It ended up working out quite nice because I was able to start the next pitch with enough gear to make the difficult lower section comfortable.
Pitch 8
Before setting off we noticed the party behind us had started to simul. Langston and I decided to hang out and let them pass us. They were moving fast and doing awesome. They were really nice and I even got a few nice shots of them as they moved up.

They eventually passed and we continued onto the next pitch. I moved through the roof fairly quickly which ended on an easy 4th class slab. Pushing onward I made it to the final belay. I slung a large rock horn with a shoulder length sling and backed it up with a red #1. I belayed Langston up and we celebrated making it up the hard part of Snake Dike alive.
 |
| The belay at the final pitch. |
Now onto the never ending slabs. We kept our rock shoes on as the slabs were a bit steep and we liked the extra security. Even if you were to stay roped up, you would be soloing most of this featureless terrain. Take it slow, look for the easiest path up and make your partner go first. Then you will be able to avoid all of the sketchy slab that he has to down climb. There are a couple of false summits which destroyed our spirits but we trudged along just fine with a couple of breaks. We decided to go almost right down the middle of the slabs, veering left occasionally when we were not super sure.
 |
| On the slabs |
At 11:30 am we finally topped out! We descended for a small portion and continued upwards to the summit with the crowd of people hanging out. For mid day on a weekend it surprisingly was not too crowded. We dropped our packs and sat down gassed from the slabs.
 |
| Us moving to the summit |
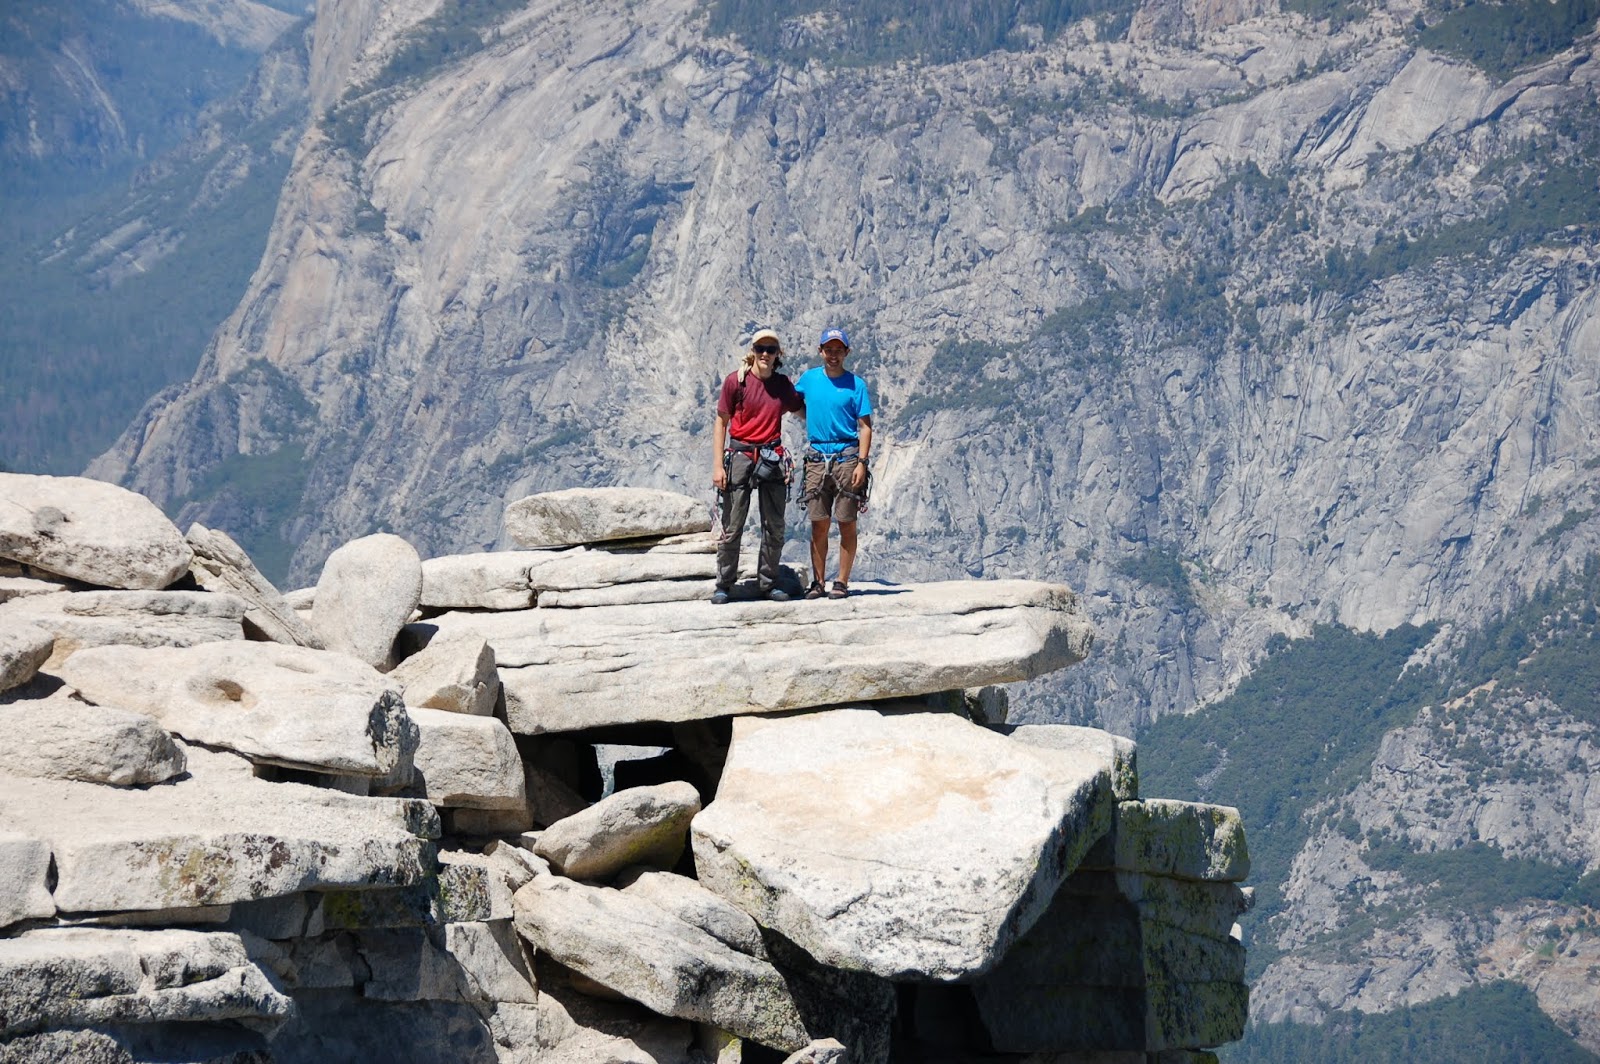 |
| We made it!!!! |
After sitting for a minute, the party that passed us was super nice and took some amazing photos of us on the diving board! I took some photos for them on the diving board but I managed to take a good half of them out of focus. Y'all were really nice and I am so sorry for the disappointing photos.
After we drank some water, snacked a bit, and watched the squirrels prey on other tourists food. Eventually we decided to keep moving and descend the cables. As this was the first time for both of us on Half Dome, we wandered aimlessly around looking for the cables for a couple of minutes until we found them.
We left our harnesses on and descended the outside of the cables, clipping them as we went down. The last minute decision to bring gloves was one of the better decisions we made early that day, it made the cables a lot more secure. It must have been rush hour on the cables as we descended past a never ending large crowd of people ascending. The most dangerous part is others on the cables. While we realize we were the sketchy ones on the outside of the cables, quite a few people power upwards without regard to others. We also watched two separate people drop things, a lens cap and a phone. After watching them fall for a few seconds from the top we were the first ones to call rock. Be careful out there.
 |
| The congo line viewed from sub dome. |
From here we just followed the trail back to intersect with the Mist Trail. It was quite warm at this point so Langston and I moved fairly slowly. The trail was wooded but offered little shade. Eventually we made it down to the Merced River where we were rewarded with cold filtered water. It was quite amazing.
From there we headed to Nevada Falls and descended the Mist Trail. There were tons of tourists so progress was slow but the views were nice. On the way down we ran into a pair of extremely nice rangers who chatted with us for a few moments until we continued on our way.
At 4pm we finally made it back to the car. Both Langston and I were extremely tired at this point. We stashed our gear and went to Curry Village for pizza. While the descent was quite rough it was a fun day with some great climbing.
The Takeaways
So what did we learn on this trip? Things went quite well, but could things have even gone better? Yeah, let's detail them below.
Timing
For summer time, we did great. We were a little slow but with transitions and heat accounted for it worked out fairly well. Would recommend going in Fall or late Spring though, the descent will be a lot more pleasant
Gear
What could we have changed? I would have only brought five draws and left all the nuts behind. If you are feeling like saving some extra weight and do not mind running it out a lot, you could likely get away with only four cams (singles) but you would have to definitely run it out and save for the gear anchors up top.
What we did get right though was all the other gear. We went as light as we could and brought enough water to keep us safe. If our packs were any heavier I think we would have had a lot worse of a day. With light packs we got to the base of the climb feeling extremely strong and that made the calf burning ascent a lot easier.
Climbing Preparation
I went into this as a confident 5.9 trad leader. I also have gotten fairly used to running it out while climbing vertical routes at Pinnacles NP and slabs at Tollhouse Rock. By no means does this mean I'm an advanced climber, but I feel those experiences mentally prepared me for the skills required to lead this route. While I definitely was not always comfortable I was always able to muster up the confidence to pull the moves and get it done. Most of the time you are basically soloing so be mentally prepared for that.
As for following, anything goes. This was Langston's second time climbing outside and first time doing multi-pitch. He did amazing and as long as they've climbed before they will likely be alright.
Conclusion
So what now? If you've read this and think you can do it, go for it! This is by far the best climb I've ever done and am so glad I was able to experience. I'd been wanting to climb Half Dome for three years and I had no idea I would be going up a technical rock route when I first considered it. All in all, this definitely should be a route on any moderate climber's tick list.
Happy climbing!!!
-m


Beautiful pictures!!
ReplyDelete